Minter for beginners: How To Launch A Token On The Open Network - part 2
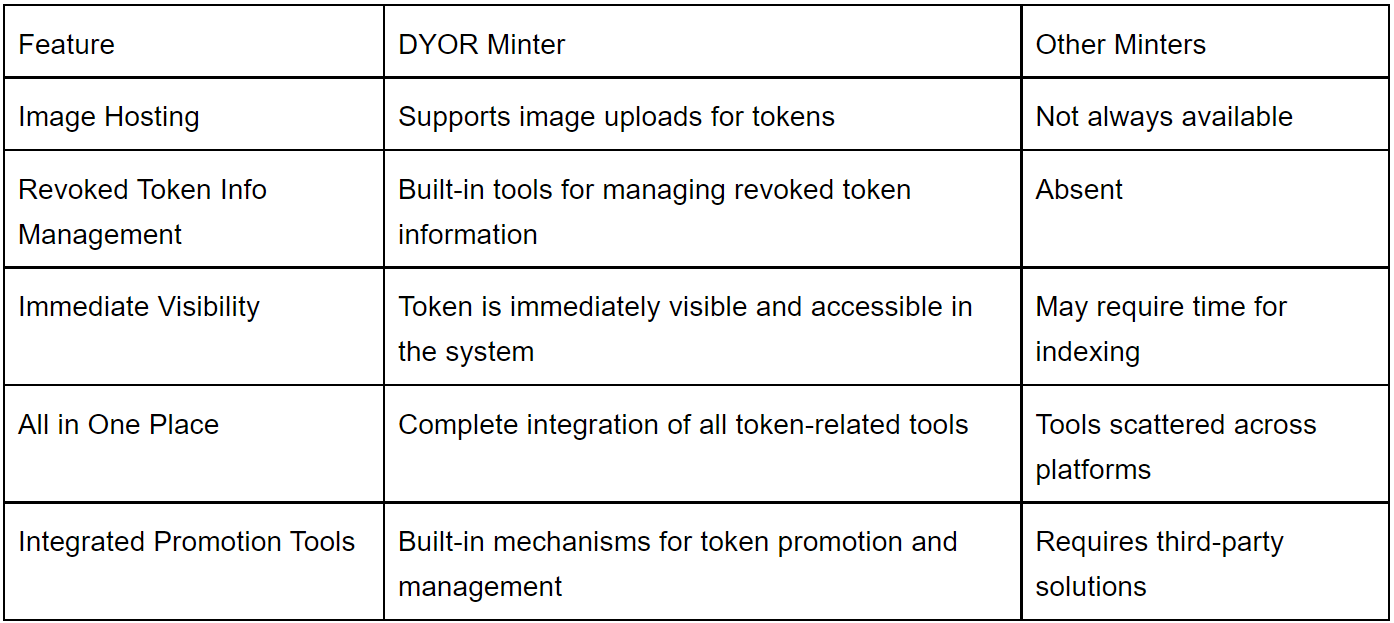
DYOR Minter vs Other Minters
Creating tokens on the TON blockchain requires a reliable and functional tool, and DYOR Minter excels in this task. As highlighted in the article about DYOR Minter, the platform offers several advantages. These include support for image hosting, simplifying the visual representation of tokens, and the ability to manage revoked token information, which helps keep data updated in real-time. Tokens become visible immediately after issuance, allowing users to start interacting with them quickly. All necessary tools - from token creation to promotion - are available in one place, eliminating the need for third-party services. The integrated promotion mechanisms make DYOR Minter convenient for those who want not only to create a token but also to promote it effectively.
Demo video of token creation in DYOR Minter
What's next? What happens after minting?
After successfully creating a token through DYOR Minter, it appears on the network, but the process doesn't end there. The token does not yet have market value and cannot be traded until liquidity is added. Let's look at what needs to be done in the next stages.
How to add a contract to a wallet?
There’s no need to manually add the token contract to the wallet. After minting, the token automatically becomes visible in your wallet. This is convenient, as there is no need to search for or enter the contract manually - the wallet immediately recognizes the new asset.
How to make a transaction?
At this stage, you can send tokens to other users or burn them, but to begin trading or conducting buy/sell transactions, liquidity must be added. Without it, your token cannot be used on decentralized exchanges (DEX) for trading. Buy/sell transactions become possible only after liquidity is added in a pair with TON (TON/token).
How to add liquidity?
Adding liquidity is key to getting your token to “live” on decentralized exchanges. After this, the token can be freely swapped for TON and other assets. Let's break down how to do this on the most popular DEX platforms on TON.
STON.fi
- Connect Wallet: Visit STON.fi and connect your TON wallet. It should contain the tokens you intend to use for adding liquidity.
- Create a Pool: From the menu, select "Create Liquidity Pool." This is your step toward launching trading for your token.
- Select Tokens for the Pair: You need to specify two tokens - TON and your own. If your token doesn’t appear, enter its contract address to add it manually.
- Specify Amount: Enter how much TON and your token you are ready to contribute. Balance the pair - the number of tokens should be proportional.
- Confirm Transaction: Ready? Double-check the data and click “Confirm” through the wallet. Your liquidity is now added, and trading for your token begins!
DeDust
The process is almost the same but with slight differences:
- Connect Wallet: Go to DeDust and connect your TON wallet.
- Open the "Liquidity" Section: Find it in the top menu - it’s your path to adding liquidity.
- Choose the Pair: Specify TON and your token. If your token isn’t visible, add it manually by entering the contract address.
- Set Amount: Enter the amount of TON and your token for liquidity. Ensure the balance is correct.
- Confirm the Transaction: Finish the process by confirming through the wallet - and that’s it, liquidity is added! Your token can now be swapped and traded on DeDust.
What’s next?
After creating a liquidity pool, your token becomes available for swaps and trades through STON.fi, DeDust, and aggregators like Swap.Coffee. You can also swap your token on DYOR. Now it’s not just in existence - it’s part of the trading ecosystem!
How to list a token on an exchange?
So, you’ve added liquidity and made your first trades with your token. What’s next? The next important step is listing it on a cryptocurrency exchange. This is the moment when your token enters the open market, where it can be purchased not only by your friends but by thousands of investors worldwide. Listing is not just about marketing; it’s a way to attract fresh participants to your project, increase liquidity, and boost the recognition of your token.
To understand how to organize everything properly and avoid mistakes, I recommend checking out our detailed guide on how to list a token on an exchange. There, you'll find step-by-step instructions and tips to help you go through this process with minimal risks and maximum success.
How to view the chart on DYOR?
Once you’ve added liquidity and made at least one transaction, you can view the price chart for your token. To do this, simply visit the DYOR platform, enter the token’s contract address in the search bar - and that’s it! Now you can track price movements in real time. Remember, the chart won’t appear before the first transaction, so it’s important to add liquidity and start trading.
Alternative: TON Minter
If you are looking for an alternative way to create tokens on the TON blockchain, consider TON Minter - the official tool provided by the TON Foundation. This service is designed to make token issuance accessible even for beginners, offering an intuitive interface and simple steps for creating tokens.
Key steps for token creation through TON Minter
Preparation for creation
Before you begin issuing a token, make sure you have a TON wallet, such as Tonhub or Tonkeeper, and the necessary balance (it’s recommended to have at least 0.5 TON to cover fees). These wallets will give you full access to TON’s ecosystem features, including token creation and management.
Setting token parameters
When creating a token through TON Minter, you specify the following parameters:
- Token name: Come up with a memorable name that will be clear and easy to recognize. It will appear in wallets and blockchain explorers.
- Symbol (ticker): This is a short designation for your token, usually 3-5 capital letters, such as “TON” or “MYT.”
- Token quantity: Specify how many tokens you want to create. Once created, they will immediately appear in your wallet, and you can manage them.
- Description: An optional parameter that helps users understand what your token is for. You can leave it blank or add a brief project description.
- Logo: If you want your token to look professional, upload a logo - PNG 256x256 with a transparent background. It’s best to host it on GitHub Pages or another reliable service so it’s always accessible.
After filling in all the fields, double-check the data since some of it cannot be changed after creation. Confirm the transaction through your wallet, and your tokens will appear in your balance.
Token management and customization
After creating tokens through TON Minter, they automatically appear in your wallet, allowing you to start managing them immediately - sending them to other users or trading on exchanges. However, if you want to customize the token for specific needs, TON Minter supports customization through the FunC programming language. This allows you, for example, to implement transaction fees or set up automatic token burning under certain conditions.
For advanced users, customization via FunC opens up virtually limitless possibilities for creating unique tokens with special features.
Control and transparency
TON Minter also offers the ability to track all operations and transactions of your token through the Tonscan blockchain explorer. This provides full transparency for all actions related to your token, including issued amounts, buy/sell operations, and interactions with other users. In this way, you can control all aspects of your token’s operation on the blockchain.
Security and best practices
TON Minter adheres to high-security standards. In the token creation process, it’s important to follow best practices, such as storing metadata on-chain, revoking admin rights to prevent manipulation, and using verified smart contracts like Jetton Minter. This will ensure the longevity of your project and protect it from potential risks.

